-1.jpg) |
🔹 碗 粿
雖然現在已經越來越少見
粿的軟嫩口感搭配菜脯的爽口清脆
這種最簡單質樸的美好古早味
就是媽和我都愛的臺灣北部碗粿
臺灣閩南人講的「碗粿」,就是客家人講的「水粄」,但是臺灣北部碗粿 (水粄) 的傳統做法與臺南碗粿不太一樣。臺南碗粿會把配料放在碗粿裡面,但是北部碗粿 (水粄) 會把配料放在碗粿上面。臺南碗粿的配料比較豐富,北部碗粿 (水粄) 的配料比較簡單。我這裡示範的北部碗粿配料是最簡單的版本,可以自己再增加其它的配料,例如豆干、韭菜等等。如果要做甜碗粿(甜水粄),就改成加一點點鹽,另加半碗(60g)的黑糖,與米和水一起打成米漿,加熱糊化後蒸熟即可,不用再加其它的鹹配料。另外,這裡示範的菜脯 (蘿蔔乾) ,除了可用來做碗粿 (水粄) 以外,也可以用來煎菜脯蛋或包粽子。碗粿 (水粄) 配上自己做的菜脯 (蘿蔔乾) ,不但好吃,而且也不用擔心防腐劑的問題哦。(文末附影片)
🔹 Wa Gui
Despite its increasing rareness nowadays,
Crunchy dried radish with soft and springy rice cake,
This dish of simple and minimalist good old taste
Is me and Mum's favourite northern Taiwan wa gui.
Taiwanese wa gui (savoury rice pudding) is also called "shui ban" by Hakka people in Taiwan. But its traditional style in northern Taiwan is different from the one in Tainan. Tainan's wa gui has its fillings inside while northern Taiwan's wa gui goes with some toppings only. The fillings of Tainan wa gui are rich and abundant while the toppings of northern Taiwan wa gui are much simpler. The topping of the northern Taiwan wa gui I demonstrate here is the simplest version. You can add other kinds of savoury ingredients if you like, such as dried tofu, chopped leek, etc. If you intend to make sweet wa gui, just add 60g of brown sugar with less salt to the rice before processing. Besides making wa gui, the dried radish I demonstrate here can also be used to make preserved radish omelette (chai poh neng) and Hakka zongzi (AKA sticky rice dumplings or bacang). Northern Taiwan wa gui with the topping of homemade dried radish is not only really delicious, but also you don't need to worry about the problem of chemical preservatives at all. (See the video tutorial at the end.)
. . . . . . . . . . . . . . . . . . . . . . . . . . . . . . . . . .
. . . . . . . . . . . . . . . . . . . . . . . . . . . . . . . . . .
材 料(Ingredients):
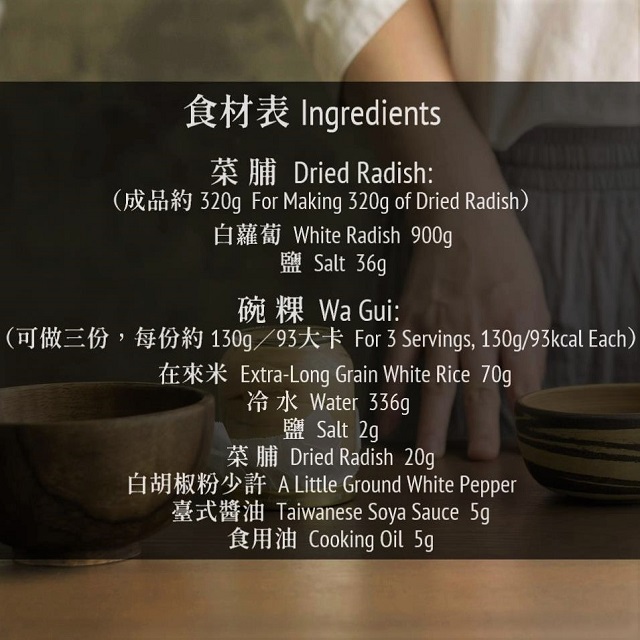 |
| 製作菜脯與碗粿的食材一覽。圖片來源:cooking23s.blogspot.com |
步 驟(Steps):
(1)
白蘿蔔洗淨擦乾,去頭去尾,切成長條狀。
Wash a white radish and dry it. Cut off both ends and chop it into strips.
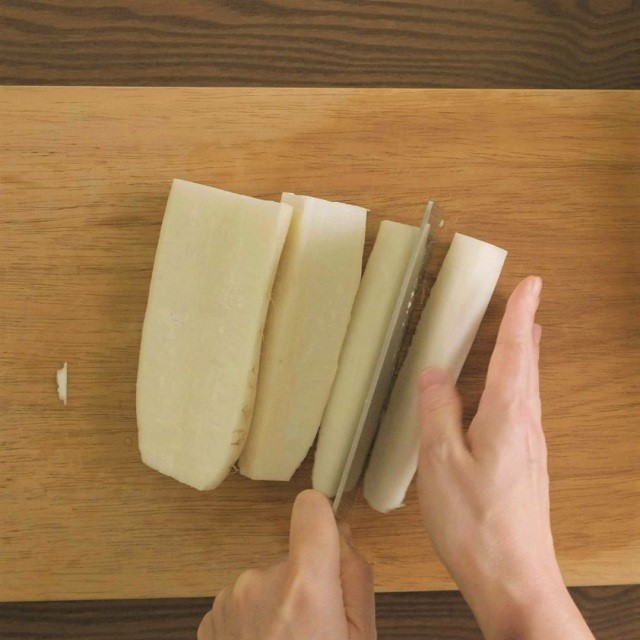 |
| 先把白蘿蔔從中間切成兩半,再各自切成八條,合計為十六條長條狀的白蘿蔔(共約九百公克)。圖片來源:cooking23s.blogspot.com |
(2)
把切好的白蘿蔔放置陽光下曬四到八小時(視陽光大小而定)。中途翻面一次。
Leave them in sunlight for 4 to 8 hours (depending on the sunlight level). Flip them over midway through the process.
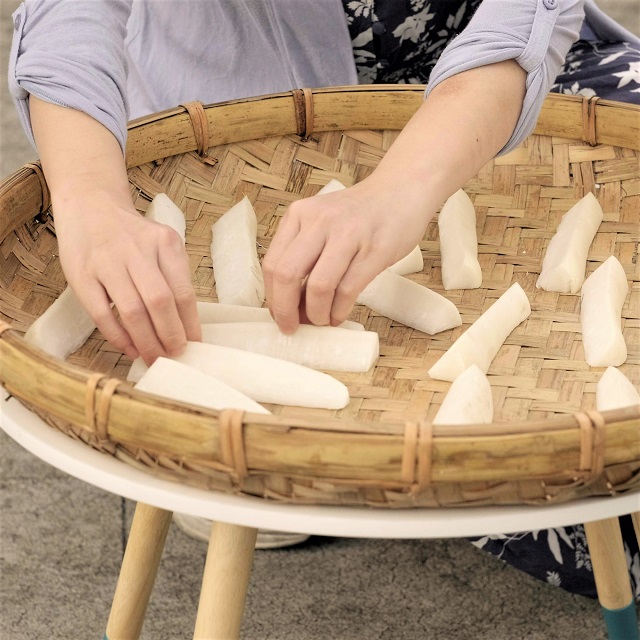 |
| 陰天也可以曬,只是要曬久一點。圖片來源:cooking23s.blogspot.com |
(3)
把白蘿蔔條放在鍋內,加入十八公克的鹽,不斷搓揉,直到白蘿蔔條變軟為止。
Leave them in a pot and add 18g of salt. Rub them until they soften.
 |
| 至少要搓揉好幾分鐘才會變軟。圖片來源:cooking23s.blogspot.com |
(4)
把它們放入一個網袋中,把網袋開口綁緊,放在合計約四公斤的重物下。壓三小時後,翻面,然後再持續壓過夜。
Leave them in a net bag and put the bag under heavy objects of about 4kg in total. Flip the bag over after 3 hours and continue to press the bag overnight..
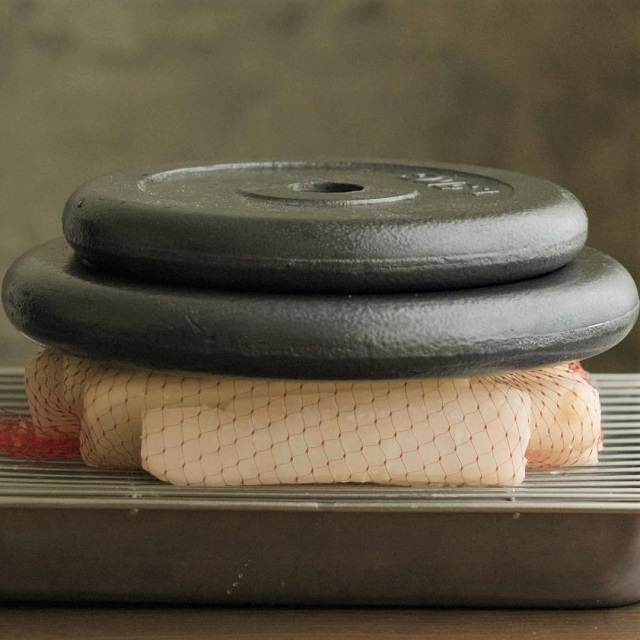 |
| 可在烤盤上放置鐵架,再放網袋以及槓片,讓白蘿蔔的汁液流到烤盤裡。圖片來源:cooking23s.blogspot.com |
(5)
第二天重複同樣的曬與加鹽下去搓揉的步驟。最後壓的時候,改用合計約 1.5 公斤的重物即可,並且這次不用翻面。
Repeat the same process on the next day. At the end of the day, put the bag under heavy objects of about 1.5kg in total and you don't need to flip it over this time.
(6)
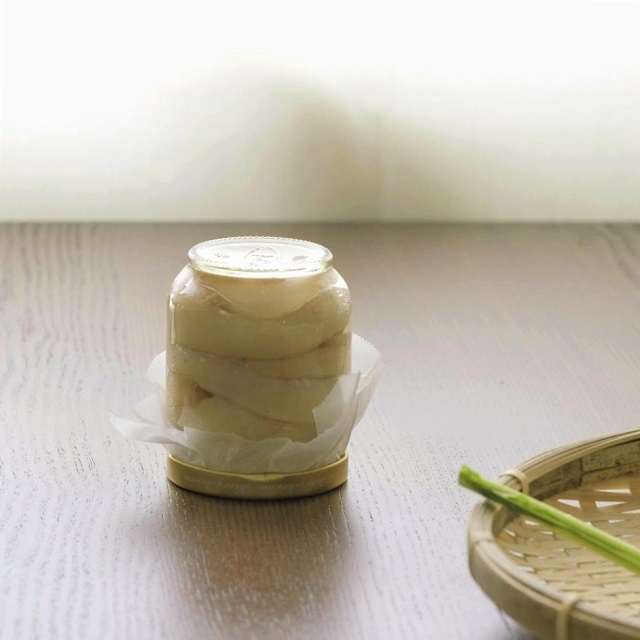
第三天,把蘿蔔條放置陽光下曬四到八小時(視陽光大小而定)。中途翻面一次。曬完後,蘿蔔條的顏色應已變深,將它們塞入一個小玻璃罐中,罐口鋪上一小張烘焙紙,再蓋上蓋子轉緊,靜置室溫兩週。兩週後可冷藏保存。
Leave the radish strips in sunlight for 4 to 8 hours again on the third day. Flip them over midway through the process. After the colour has deepened, press them into a little glass jar. Cover the opening with a small piece of baking paper and put the lid on. Close the jar tightly. Leave the jar at room temperature for 2 weeks. Preserve them in a fridge afterwards.
 |
| 不用擔心蘿蔔條太髒,之後會再洗過。圖片來源:cooking23s.blogspot.com |
 |
| 所謂室溫是指約攝氏二十幾度。圖片來源:cooking23s.blogspot.com |
(7)
兩週後,把七十公克的在來米洗淨瀝乾,泡水三到四小時。
2 weeks later, wash and drain 70g of extra-long grain white rice. Then, soak the rice in water for 3 to 4 hours.
(8)
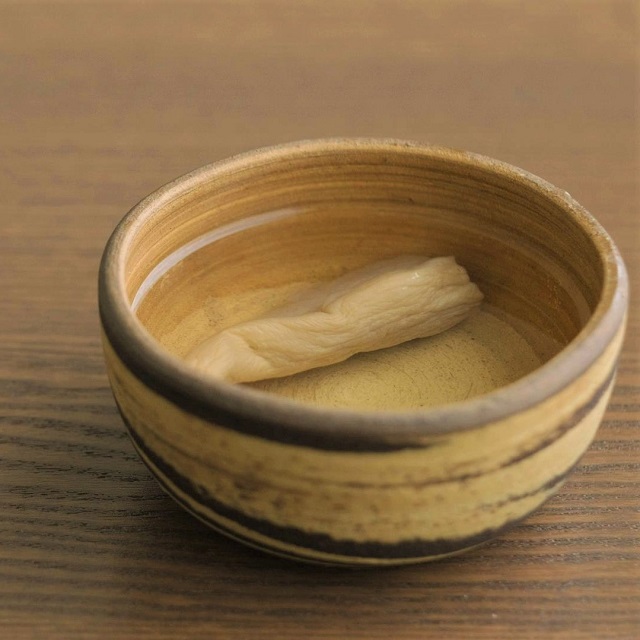
取出一條約二十公克重的菜脯(蘿蔔乾),洗淨,泡水約二十分鐘,泡好後擰乾切丁。
Wash a strip of dried radish (about 20g) thoroughly. Soak it for about 20 minutes. Then, drain the dried radish and chop it into small dices.
 |
| 洗淨泡水的菜脯。圖片來源:cooking23s.blogspot.com |
(9)
炒鍋放入五公克食用油以及切好的菜脯。開中火。炒一會兒後,轉小火。加入五公克的臺式醬油炒勻。加入少許白胡椒粉,炒勻後,關火,備用。
Add 5g of cooking oil and the chopped dried radish in a pot over medium heat. Stir-fry the dried radish for a while. Turn down the heat to the low level. Add 5g of Taiwanese soya sauce. Add a little ground white pepper. Stir-fry them until well-mixed. Turn the heat off and set aside the stir-fried dried radish.
 |
| 切好的菜脯。圖片來源:cooking23s.blogspot.com |
 |
| 剛炒好的菜脯。圖片來源:cooking23s.blogspot.com |
(10)
在臺式電鍋的外鍋放入兩米杯的水(合計 360 公克)。放入三個碗。蓋上蓋子,開啟電鍋電源。
Add 360g of water in the outer pot of a Taiwanese rice cooker. Leave 3 bowls inside. Put the lid on. Turn on the cooker.
(11)
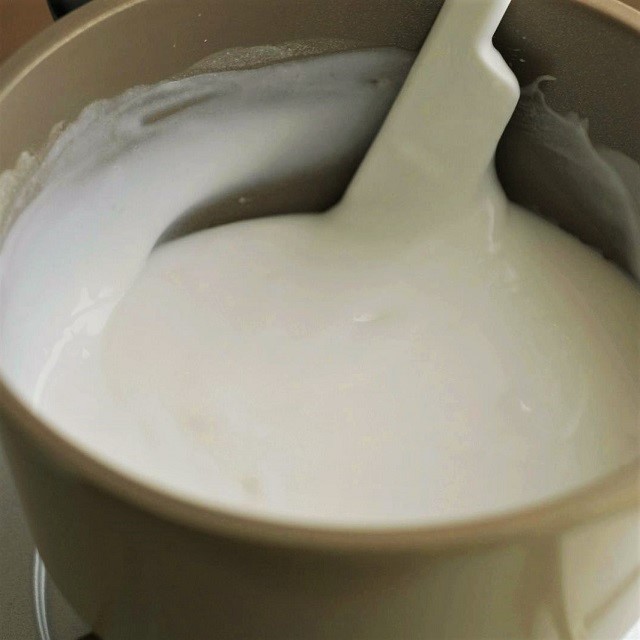
把泡好的米瀝乾,用調理機打成細緻的粉漿。把粉漿倒入鍋中,加兩公克的鹽,先開中火,邊加熱邊攪拌粉漿,再轉小火,持續攪拌粉漿至其糊化為止。
Drain the soaked rice and process it into rice liquid with a processor. Add the rice liquid and 2g of salt in a pot over medium heat. Stir the rice liquid. Turn down the heat to the low level. Keep stirring until it has become smooth paste.
 |
| 逐漸糊化的粉漿。圖片來源:cooking23s.blogspot.com |
(12)
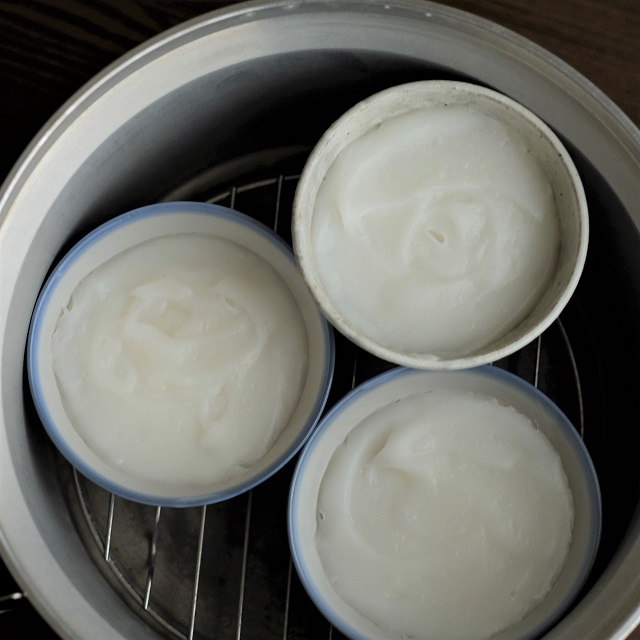
把糊化的粉漿倒入用電鍋加熱過的熱碗,把粉漿表面抹平,放入電鍋中,蒸二十至二十五分鐘。
Pour the paste into the hot bowls. Flatten the surfaces. Leave the bowls in the rice cooker and steam them for 20-25 minutes.
 |
| 還沒蒸之前的模樣。圖片來源:cooking23s.blogspot.com |
(13)
把蒸好的碗粿從電鍋取出,放涼後,再把碗粿從碗中取出,在其上方加些炒好的菜脯,淋上少許臺式醬油,即大功告成。
Take out the bowls and cool them down. Get the wa gui out of the bowl and leave some stir-fried dried radish on top of it. Add some Taiwanese soya sauce on top of it. Then, voila!
 |
| 剛蒸好的碗粿。圖片來源:cooking23s.blogspot.com |
 |
| 成品示意圖。圖片來源:cooking23s.blogspot.com |
旁白配樂版影片 Video Tutorial With Talking & Music:
原音重現版影片 Video Without Talking or Music (ASMR):
. . . . . . . . . . . . . . . . . . . . . . . . . . . . . .
. . . . . . . . . . . . . . . . . . . . . . . . . . . . . .(1)
切蘿蔔的時候,儘量把蘿蔔切成一樣大,這樣比較能夠曬得均勻。
It's best to chop the radish into pieces of the same size so that they can be dried by sunlight evenly.
(2)
先把蘿蔔曬過再醃,做出來的口感較脆、較不會太韌。
The radish should be dried by sunlight before fermentation so that it can be crunchy and not too chewy.
(3)
曬蘿蔔時,如果遇到下雨天,把蘿蔔放在陰涼處通風就可以了。
If it's raining, just leave the radish in a well-ventilated place in the shade.
(4)
鹽如果加太少,菜脯容易發霉。如果怕太鹹,要煮之前可以把菜脯泡水泡久一點。
The radish is easy to get mouldy if you add too little salt. You can soak the dried radish in water longer before cooking if you don't want it too salty.
(5)
儘量用菜脯把罐子裝滿,空氣少一點,比較不會發霉。
Do your best to fill the jar with the dried radish. Less air, less chance to get mouldy.
(6)
用純米做的碗粿(水粄)又軟又嫩,也不用擔心有霉味。
The wa gui made from real rice is soft and tender. Besides, you don't need to worry about the chance of having a mouldy flavour.
(7)
先把碗加熱,碗粿(水粄)蒸好之後比較不會黏在碗上。
Heat the bowls first so that it will be easier to get the wa gui off the bowls afterwards.
(8)
要蒸之前,先把粉漿加熱攪拌均勻,使其糊化,碗粿(水粄)才會好吃。
Before steaming, heat up the rice liquid while stirring until it has become smooth paste so that the wa gui can has the right texture.
(9)
純米做的碗粿(水粄),要等它放涼之後,吃起來才會Q。
The wa gui made from real rice can be springy only after it has cooled down.
(10)
做好的碗粿(水粄)可以冷藏保存兩天,要吃之前可先用電鍋蒸過。
The wa gui can be preserved in a fridge for 2 days. It can be steamed with a Taiwanese rice cooker before being served again.
留言
張貼留言