 |
不論平日或假日,淡水老街上的現烤古早味蛋糕舖總是排滿了來自世界各地的引頸盼望人龍。曾幾何時,綿密細緻、蛋香逼人的台灣古早味蛋糕竟已紅遍海內外,成為繼鳳梨酥之後,另一項必嚐、必買的台灣之光(這是一款好吃、好聞勝過表面好看的蛋糕。若您很注重蛋糕的外觀是否好看,可先 google 搜尋 "淡水古早味蛋糕" 的圖片,看看它真正道地的外觀後,再決定要不要用這裡的食譜來試做)。這款蛋糕的做法,表面上看似簡單,但只要配方比例、烤溫、甚至烤模擺置方法稍有閃失,做出來的蛋糕就很難彰顯出其特有的香味與口感。以下介紹的食譜做法,不但簡單(免燙麵、免水浴法),而且做出的古早味蛋糕極具道地特色。當下次大家嘴饞,又不想大老遠地跑去排隊時,不妨在家自己做做看(文末附影片)。
Apart from pineapple cake, Taiwan's castella cake has become another must-buy item on the island. This old-time local flavour is super soft and fluffy with moistness and a mouthwatering smell of egg that you can hardly resist. By the way, this is a kind of cake which is good-eating, good-smelling, but not necessarily good-looking. You can search for "Tamsui original castella cake" first to make sure you can accept its look before following the recipe here. (See the video tutorial at the end.)
. . . . . . . . . . . . . . . . . . . . . . . . . . . . . . . . . . . . . . . . . . . . . . . . . . . . . . . . . . . . . . . . . . . .
材 料(Ingredients):
(適用八吋正方形烤模)(For an 8-Inch Square Cake Pan )
* 葡萄籽油或沙拉油(Grape Seed Oil or Salad Oil):70 g
* 牛奶(Milk):80 ml
* 低筋麵粉(Cake Flour):120 g
* 蛋黃(Egg Yolks):125 g(約七顆蛋)(From About 7 Eggs)
* 天然香草精(Natural Vanilla Extract):數滴(A Drizzle)
* 蛋白(Egg Whites):268 g(約七顆蛋)(From About 7 Eggs)
* 細砂糖(Superfine Sugar):120 g
* 檸檬汁(Lemon Juice):1 t
 |
| 古早味蛋糕製作所需食材一覽。圖片來源:cooking23s.blogspot.com |
步 驟(Steps):
(1)
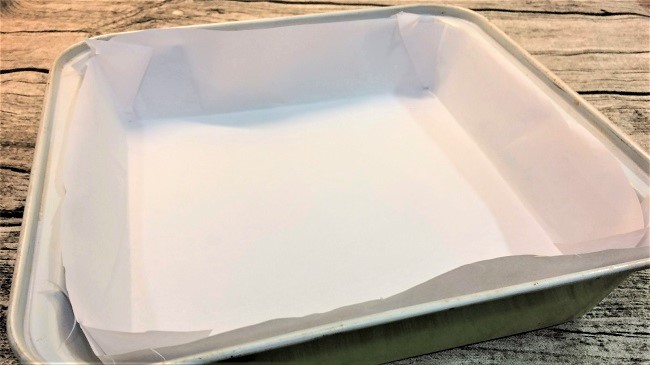
墊白報紙在烤模內(烘焙紙太滑了,不利蛋糕長高)。蛋黃與蛋白分開,蛋白冷藏備用。烤箱預熱 175°C(上下火皆同)。
Line the bottom of the pan with ordinary paper. Separate egg yolks from egg whites and leave the egg whites in a fridge. Preheat an oven to 175°C.
 |
| 在白報紙上描出烤模的形狀。圖片來源:cooking23s.blogspot.com |
 |
| 依照描繪的形狀折好後,將四個角剪開。圖片來源:cooking23s.blogspot.com |
 |
| 將白報紙置入烤模中,倘若放好後的白報紙邊緣超出烤模太多,可再予以修剪。圖片來源:cooking23s.blogspot.com |
(2)
油與牛奶稍微退冰後混合,加入過篩後的低筋麵粉稍微攪拌,加入蛋黃、香草精,快速攪拌成質地均勻的麵糊。
Mix up the oil, milk, sieved flour, egg yolk, and vanilla extract.
油與牛奶稍微退冰後混合,加入過篩後的低筋麵粉稍微攪拌,加入蛋黃、香草精,快速攪拌成質地均勻的麵糊。
Mix up the oil, milk, sieved flour, egg yolk, and vanilla extract.
 |
| 蛋黃糊攪拌均勻後,有如蜂蜜滴落的模樣。圖片來源:cooking23s.blogspot.com |
(3)
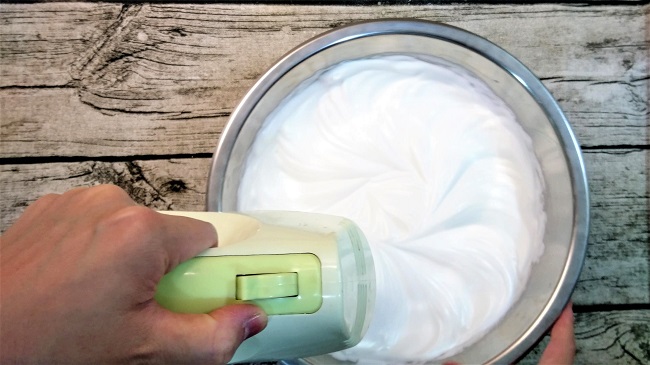
用電動打蛋器打蛋白,先以高速打至粗泡,加入三分之一的糖後,以中速繼續打,再加三分之一的糖,打至濃稠,然後加入最後三分之一的糖與檸檬汁,打至接近乾性發泡(打蛋器拿起,蛋白霜呈現微彎的形狀,或筷子插入蛋白霜中可直立不倒即可)。由於此款蛋糕烤完不倒扣,所以蛋白霜需打至接近乾性發泡,烤完後才比較不易坍塌,但要小心別打過頭(太乾),以免蛋白霜消泡,影響蛋糕口感。打蛋白霜過程大約歷時八分鐘。
Beat the egg whites for about 8 minutes. Divide the sugar into 3 portions and add them separately along with lemon juice into the mixture while beating.
 |
| 一邊旋轉鍋子一邊使電動打蛋器沿著鍋子邊緣攪拌。圖片來源:cooking23s.blogspot.com |
 |
| 蛋白霜打好後的樣子。圖片來源:cooking23s.blogspot.com |
(4)
將三分之一的蛋白霜倒入蛋黃糊中拌勻,再倒入另外三分之一蛋白霜拌勻,然後將蛋黃鍋內的麵糊倒入蛋白鍋內與剩下的蛋白霜拌勻。攪拌時,先以手持打蛋器大致混合,再以刮刀從鍋底翻轉攪拌至蛋黃糊與蛋白霜完全混合均勻即可。拌好的麵糊應該呈現不易流動的濃稠狀。
Divide the egg-white mixture into 3 portions. Add them to the egg-yolk mixture one by one and mix them up until the mixture becomes thick and creamy.
將三分之一的蛋白霜倒入蛋黃糊中拌勻,再倒入另外三分之一蛋白霜拌勻,然後將蛋黃鍋內的麵糊倒入蛋白鍋內與剩下的蛋白霜拌勻。攪拌時,先以手持打蛋器大致混合,再以刮刀從鍋底翻轉攪拌至蛋黃糊與蛋白霜完全混合均勻即可。拌好的麵糊應該呈現不易流動的濃稠狀。
Divide the egg-white mixture into 3 portions. Add them to the egg-yolk mixture one by one and mix them up until the mixture becomes thick and creamy.
 |
| 一邊旋轉鍋子一邊攪拌,務必使蛋白霜與蛋黃糊充分混勻。圖片來源:cooking23s.blogspot.com |
(5)
從至少十五公分高度處將混合好的麵糊倒入烤模內(以去除大氣泡),用刮刀整理鋪平麵糊表面。
Pour the mixture into the baking pan. Use a spatula to flatten the surface of the paste.
從至少十五公分高度處將混合好的麵糊倒入烤模內(以去除大氣泡),用刮刀整理鋪平麵糊表面。
Pour the mixture into the baking pan. Use a spatula to flatten the surface of the paste.
 |
| 以刮刀將麵糊表面整理平順。圖片來源:cooking23s.blogspot.com |
(6)
送入預熱好的烤箱,以 175°C 烤約三十分鐘後,將蛋糕調頭,再烤二十分鐘後出爐,稍微敲模後取出蛋糕(脫模)。
Bake the paste in a preheated oven with a heat of 175°C for 30 minutes. Turn the pan around and bake it for another 20 minutes. Separate the cake from the pan.
送入預熱好的烤箱,以 175°C 烤約三十分鐘後,將蛋糕調頭,再烤二十分鐘後出爐,稍微敲模後取出蛋糕(脫模)。
Bake the paste in a preheated oven with a heat of 175°C for 30 minutes. Turn the pan around and bake it for another 20 minutes. Separate the cake from the pan.
 |
| 蛋糕脫模後先不用急著撕白報紙。這只是剛脫模的樣子,記得把蛋糕翻正後再放涼。圖片來源:cooking23s.blogspot.com |
(7)
將蛋糕放置於散熱架上約十五分鐘後,即可撕紙切開食用。
Remove the paper from the cake after 15 minutes. Then, voila, it's done.
將蛋糕放置於散熱架上約十五分鐘後,即可撕紙切開食用。
Remove the paper from the cake after 15 minutes. Then, voila, it's done.
 |
| 稍微降溫後再撕紙切開食用。如果一烤好就撕紙,蛋糕較易塌陷。圖片來源:cooking23s.blogspot.com |
 |
. . . . . . . . . . . . . . . . . . . . . . . . . . . . . . . . . .
. . . . . . . . . . . . . . . . . . . . . . . . . . . . . . . . . .
(1)
白報紙不要墊太高,以不超出烤模高度為原則,否則蛋糕在長高的過程中將無法外擴形成漂亮的裂痕,烤好後容易往內塌陷、影響口感。
The height of the paper should not exceed the height of the pan. Otherwise, the cake may collapse easily after being baked.
白報紙不要墊太高,以不超出烤模高度為原則,否則蛋糕在長高的過程中將無法外擴形成漂亮的裂痕,烤好後容易往內塌陷、影響口感。
The height of the paper should not exceed the height of the pan. Otherwise, the cake may collapse easily after being baked.
(2)
添加香草精是為了去除蛋腥味。如果對蛋腥味較不敏感,可以選擇不加。
We add the vanilla extract in order to remove the offensive smell of egg. It's optional if you don't care about that at all.
添加香草精是為了去除蛋腥味。如果對蛋腥味較不敏感,可以選擇不加。
We add the vanilla extract in order to remove the offensive smell of egg. It's optional if you don't care about that at all.
(3)
免燙麵、免水浴法,一樣能綿密、濕潤、Q 彈,而且蛋香更濃郁,關鍵就在於使用較多的蛋 ---- 蛋白多,能使蛋糕綿密濕潤;蛋黃多,搭配較高的烤溫,能使蛋糕烤好後散發出有如蛋捲般的香味。
The key to this special type of cake is the number of eggs used.
(4)
在將最後的麵糊倒入烤模的半途中,可以加上一些起司片,如此一來,就變成起司口味的古早味蛋糕囉~
You can add some cheese slices halfway through pouring the paste into the baking pan. (Optional)
(5)
這款蛋糕的特色在於聞起來香氣十足,而且表面一定要有外擴的裂痕。由於不添加泡打粉、烤完不倒扣、不採用水浴法,所以一定要讓它表面產生外擴的裂痕,以裂痕取代較難看的塌陷凹痕。要產生裂痕,就必須有足夠高的烤溫,而且蛋白霜需打至接近乾性發泡,但要小心別打過頭(太乾),以免蛋白霜消泡,影響蛋糕口感,另外,在把麵糊倒入烤模時,必須讓麵糊的高度差不多與烤模(以及內墊的紙)一樣高,讓麵糊在烤的時候,有往外擴的機會,不用刻意避免烤成香菇頭,也不用刻意避免裂痕產生,因為這是一款好吃、好聞勝過表面好看的蛋糕。當然,若採用水浴法,烤起來就不容易產生裂痕,也不容易凹陷,但用水浴法烤的結果會比較接近蒸的效果,其缺點就是蛋糕出爐比較不容易有那種道地的撲鼻香味。另外,由於燙麵會導致麵粉的筋性消失以及吸水性增加,需要添加更多液體,進而稀釋了蛋香味,所以這裡亦捨棄不用燙麵法來製作。最後,如果您試過了前述減少塌的方法,但還不滿意,而您真的很注重外表,或許可再試試把剛烤好的蛋糕倒扣(懸掛)一陣子,等它比較冷卻後再翻正。或者,也可改做戚風蛋糕,戚風蛋糕做法參見 https://youtu.be/5X8TcyqNJmk
It's quite normal for this kind of cake to shrink a bit after cooling off. That's why the popular shops which sell this kind of cake in Taiwan all have the cake baked on-site. Actually, when it comes to this particular kind of cake, good-eating and good-smelling are much more important than good-looking. Still, you can beat the egg-whites a bit longer and turn the baking temperature up a bit to help keep the cake in shape. You can even try and hang the cake upside down for a while to let it cool off if you really care. Or bake a chiffon cake instead. Hit the following link for the chiffon cake recipe ---- https://youtu.be/5X8TcyqNJmk
留言
張貼留言