
◆ 巧克力甘納許蛋糕
香濃滑順 細緻綿密
自製戚風蛋糕與甘納許
不只是美味而已
還承載著最誠摯的心意
巧克力甘納許蛋糕是近年來美式賣場超夯的一項商品。我們這裡的自製版本,採用自製的巧克力甘納許(鮮奶油與巧克力為一比一),搭配軟綿的戚風蛋糕體,不乾不硬,不用微波、不用配鮮奶,就很好吃了哦,而且搭配用動物性鮮奶油打發的內餡,沒有反式脂肪的疑慮,健康又美味。(附影片)
◆ Chocolate Ganache Cake
Aromatic, smooth and creamy.
Make you a chiffon cake with chocolate ganache
Not only because it's so tasty
But because I love you honestly.
This version of chocolate ganache cake is made of chiffon cake and homemade chocolate ganache (1:1). The cake is neither dry nor hard, which tastes really great by itself and doesn't need to be microwaved or go with a cup of milk. Furthermore, the filling is made of natural whipping cream, which contains no trans fats and makes the cake really tasty as well. (See video tutorial at the end.)
. . . . . . . . . . . . . . . . . . . . . . . . . . . . . . . . . . . . . . . .
. . . . . . . . . . . . . . . . . . . . . . . . . . . . . . . . . . . . . . . .
材 料(Ingredients):

步 驟(Steps):
(1)
將蛋黃與蛋白分開,蛋黃靜置室溫備用,蛋白冷藏備用。(冷藏過的蛋白較易打發,蛋白霜的穩定性也會更好。)
Separate egg yolks from egg white. Set egg yolks aside under room temperature. Set egg white aside under refrigeration, which can make the egg white easier to whip.
(2)
烤箱預熱至 160℃(上火 170℃,下火 150℃,若不能分上下火,則設定 160℃)。
Preheat an oven to 160℃ (or upper: 170℃, lower: 150℃).
(3)
隔水加熱無味食用油至 60℃。
Heat the flavourless cooking oil to 60℃.
 |
| 因為這款蛋糕需要冷藏保存,所以我們使用液態食用油,而不是奶油,這樣在冷藏之後,才不會讓蛋糕變得又乾又硬。圖片來源:cooking23s.blogspot.com |
(4)
將食用油與可可粉拌勻後,分三次加入牛奶拌勻,再加入備用的蛋黃拌勻,最後加入過篩後的低筋麵粉,拌勻成無粉粒且滑順的蛋黃糊備用。
Mix the cooking oil with the cocoa powder. Mix in the milk, the egg yolks, and the sifted cake flour respectively. Stir the mixture until it becomes smooth and creamy.
 |
| 將食用油加熱之後再與可可粉及麵粉混合,可減少麵糊中的可可粉結塊,並且避免蛋白霜消泡。圖片來源:cooking23s.blogspot.com |
(5)
電動打蛋器開中速,將冷藏過的蛋白打至呈現粗泡沫狀態時,加入三分之一的細砂糖。繼續打到糖融化後,加入另外三分之一的細砂糖。繼續打到糖融化且出現較粗的紋路後,加入最後三分之一的細砂糖。繼續打到可用打蛋器將蛋白霜拉出微彎鈎狀為止,此時蛋白霜呈現光滑細緻(接近乾性發泡)的狀態。蛋白霜一定要打發,但要小心別打過頭,以免消泡。
Whip the refrigerated egg white with an electric egg beater. Add the salt and the superfine sugar. (The sugar should be divided into 3 equal parts and added respectively.) Keep whipping them until the mixture can be slightly curved on the whip (until it stands up but falls to a slight angle, which is called a medium-stiff peak).
 |
| 打到開始出現較粗的泡泡後,就可加糖一起打了。圖片來源:cooking23s.blogspot.com |
 |
| 邊打邊轉攪拌缸,打到糖融化後,再加三分之一的砂糖,打到出現比較粗的紋路後,加入剩下的糖繼續打。圖片來源:cooking23s.blogspot.com |
 |
| 等到更立體細緻的紋路出現,再改低速,打個十到十五秒,讓蛋白霜的氣泡更小更細緻。圖片來源:cooking23s.blogspot.com |
 |
| 最後,如果打蛋器拉起能出現小彎勾,蛋白霜就完成了。圖片來源:cooking23s.blogspot.com |
 |
| 打好的蛋白霜不能放太久,最好趕緊進行下一步驟,以免消泡。圖片來源:cooking23s.blogspot.com |
(6)
打蛋器開低速檔或用手緩慢輕輕拌勻蛋白霜。先舀起大約三分之一的蛋白霜加入蛋黃麵糊鍋內,拌勻後再舀三分之一蛋白霜重複一次,最後把蛋黃麵糊鍋內的麵糊全倒入蛋白霜鍋內,先以手持打蛋器大致拌勻,再用刮刀以「切拌」的方式(由上往下切入麵糊再從鍋底翻轉攪拌,另一手同時轉動容器)拌勻,直到看不見蛋白霜為止。這個攪拌的過程不宜太久,完成的麵糊應呈現緩慢流動的且層層重疊的濃稠狀,若麵糊太稀,可能就是蛋白霜消泡了。
Stir the egg white gently by hand or a mixer at low speed. Mix one-third of the egg white with the flour paste. Blend. Mix in another one-third of the egg white. Blend. Mix the paste with the rest of the egg white. Blend with a spatula gently until smooth. Don't stir too long.
 |
| 由於蛋白霜的比重和蛋黃糊的比重不同,因此,我們將蛋白霜分批與蛋黃糊混合,逐漸拉近比重,這樣比較容易拌得均勻,也比較不會消泡。圖片來源:cooking23s.blogspot.com |
 |
| 用手動打蛋器攪拌,能比用刮刀來得均勻。先以順時鐘方式,輕輕撈起最底下的蛋黃糊,再用抖動的方式抖下麵糊。記得要一邊攪拌、一邊旋轉攪拌缸,這樣才能攪拌到所有的麵糊。等表面的蛋白霜顆粒大致均勻後,就可改用刮刀,從底部輕輕翻起攪拌,左手則逆時針旋轉攪拌缸,直到麵糊呈現輕盈滑順的狀態即可。圖片來源:cooking23s.blogspot.com |
(7)
從至少十五公分高度處將拌好的麵糊倒入六吋的蛋糕模內(以去除大氣泡),用刮刀或筷子輕拌麵糊以避免蛋糕內部烤好後產生大空洞,並以刮刀整理鋪平麵糊表面。
Pour the paste into a 6-inch cake mould from about 15cm height. Stir the paste gently and slowly with a spatula or chopstick to make sure there is no big empty space inside. Use the spatula to flatten the surface of the paste.
 |
| 送入烤箱前,也可把烤模先在桌上輕震兩下,將剩下的氣泡震出。圖片來源:cooking23s.blogspot.com |
(8)
送入預熱好的烤箱,以實際溫度 160°C(上火 170℃,下火 150℃,若不能分上下火,則統一設定 160℃)烤約三十五到四十分鐘後出爐,將蛋糕倒扣放涼後(大約四十分鐘之後),取出蛋糕(脫模),密封冷凍大約兩小時。
Bake the paste in the preheated oven at 160°C (or upper: 170℃, lower: 150℃) for about 35-40 minutes. Leave the cake upside down for about another 40 minutes to let it cool off. Separate the cake from the mould afterwards. Leave the cake in a closed box in a freezer for about 2 hours.
 |
| 倒扣放涼,若無鐵架也可用其它器具取代。圖片來源:cooking23s.blogspot.com |
 |
| 做得好的戚風蛋糕會很有彈性,因此,用手脫模就可以了,不需要用到刀子。先慢慢用雙手指腹將蛋糕整圈往中間收攏,再輕輕一剝就可將蛋糕從側邊模型中取出。圖片來源:cooking23s.blogspot.com |
 |
| 翻轉蛋糕之後,慢慢將蛋糕繞圈,小心剝離蛋糕模底即可。圖片來源:cooking23s.blogspot.com |
(9)
攪拌缸加入冷藏的動物性鮮奶油、細砂糖、可可粉,以電動打蛋器打發後,即是蛋糕的內餡,冷藏備用。(動物性鮮奶油如果不夠冰,會很難打發,因此,至少要冷藏一天以上再使用。如果是在夏天,也可先把攪拌缸冷藏後再使用。)
Add the superfine sugar and cocoa powder to the refrigerated whipping cream. Whip them with an electric egg beater to make the filling. Leave the filling in a closed box under refrigeration.
 |
| 開始有紋路出現,就表示快打好了,要將電動打蛋器改成慢速,再打個十秒,就要改用手動打蛋器攪拌。如果打得過發,會造成口感不夠滑順。圖片來源:cooking23s.blogspot.com |
(10)
大約兩小時後(蛋糕變硬後),用蛋糕刀將蛋糕分切為兩半,在中間層抹上冷藏備用的可可鮮奶油餡料後,冷藏備用。
About 2 hours later, separate the cake into 2 equal parts with a knife. Spread the filling evenly. Set aside under refrigeration.
 |
| 先將蛋糕拿去冷凍過後再分切,才能切得比較平整。圖片來源:cooking23s.blogspot.com |
 |
| 將鮮奶油放在蛋糕表面,然後左手逆時針轉動轉盤,右手拿抹刀,以大約四十五度角放在蛋糕中間保持不動,即可將鮮奶油抹平。圖片來源:cooking23s.blogspot.com |
 |
| 抹好內餡後要記得將另一半蛋糕組合起來。圖片來源:cooking23s.blogspot.com |
(11)
將剛做好的甘納許,一半放入擠花袋冷藏,一半靜置室溫。大約三十分鐘後,將靜置室溫的甘納許倒在蛋糕表面,再以抹刀抹平表面與側邊。
Leave half of the freshly made ganache into a piping bag under refrigeration. Leave another half of the ganache under room temperature. About 30 minutes later, pour the room-temperature one onto the surface of the cake. Spread the ganache evenly around the cake.
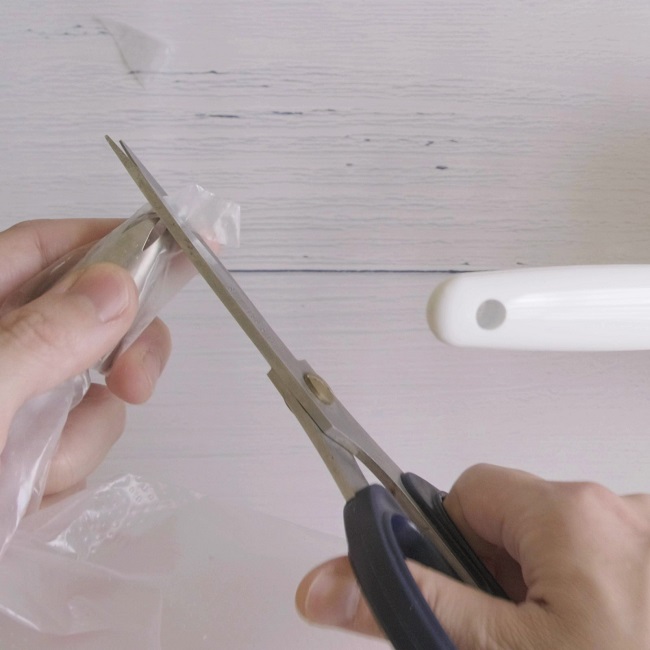 |
| 擠花袋的開口要剪到能剛好不讓擠花嘴掉出的大小。圖片來源:cooking23s.blogspot.com |
 |
| 以左手轉動蛋糕轉盤,再用右手拿鋸齒刮板,以四十五度角靠著,就可刮出側邊花紋。圖片來源:cooking23s.blogspot.com |
(12)
取出冷藏過後、稍有硬度的甘納許,擠出蛋糕表面的裝飾即可。
Press out the refrigerated ganache through the piping bag onto the surface of the cake to garnish it. Then, voila!
 |
| 自製的甘納許蛋糕不能離開冷藏太久,否則表面裝飾容易融化。圖片來源:cooking23s.blogspot.com |
 |
| 雖然採用健康又美味的食材製成,但熱量還是不低,要節制食用哦。圖片來源:cooking23s.blogspot.com |
旁白配樂版影片 Video Tutorial With Talking & Music:
原音重現版影片 Video Tutorial Without Talking & Music (ASMR):
說 明(Footnotes):
(1)
做好的巧克力甘納許蛋糕如果沒有馬上吃完,冷藏保存可放三天,冷凍保存可放一到兩週。
The chocolate ganache cake can be preserved in a fridge for 3 days or in a freezer for 1-2 weeks.
(2)
關於自製巧克力醬(甘納許)的做法,可參閱我們的巧克力甘納許做法影片與圖文版食譜。
About how to make chocolate ganache, please see our video tutorial and recipe article.
(3)
恭喜網友 淑珊 試做成功! Congratulations on 淑珊's success!
 |
| 圖片來源(Source of the Picture): www.facebook.com/100000139642630 |
😺:記得訂閱YouTube頻道哦~ 您的鼓勵就是最大的動力。
留言
張貼留言