 |
🔹 古早味肉包
外公超愛吃古早味肉包
每次探望女兒總會順便買給外孫吃
外孫長大後很想親手做些給他嚐嚐
但他已經離開很多年了
小的時候,故鄉的城隍廟口附近曾有一間專門賣古早味肉包的店。聽說那裡的肉包做法,是原本在清朝宮廷做包子的師傅傳下來的手藝。當年的肉包,皮薄餡多,吃起來鹹鹹甜甜,又Q又香。我這裡做的版本比較不油,口味也較沒那麼重,但還是超好吃的哦。除了肉包以外,這款麵團也能用來做包其它內餡的包子。(文末附影片)
🔹 Vintage Pork Bao
Vintage pork bao was one of Granddad's favourites.
He often bought some to see his daughter and grandkid.
Now the kid has grown up and want to make him some to eat.
But then, he has already passed away for years.
When I was little, there was a shop selling vintage pork bao near my hometown's City God Temple. It is said that the recipe for pork bao there was handed down by a former chef who had made pork bao in the imperial palace of the Qing Dynasty. With a thin skin and a hearty filling, the pork bao was springy, smelt really good, and had a salty and sweet taste. The version I make here is less greasy and has less seasonings. But it's still super tasty. Apart from pork bao, the dough can also be used to make other kinds of bao with different kinds of fillings. (See the video tutorial at the end.)
. . . . . . . . . . . . . . . . . . . . . . . . . . . . . . .
. . . . . . . . . . . . . . . . . . . . . . . . . . . . . . .
 |
| 製作古早味肉包的食材一覽。圖片來源:cooking23s.blogspot.com |
步 驟(Steps):
(1)
把 70 公克的絞肉與香蔥油、醬油、砂糖、油蔥酥一起炒熟,放涼備用。
Stir-fry 70g of the pork mince with the shallot oil, soya sauce, fine sugar, and fried shallots. Set the stir-fry aside and let it cool down.
 |
| 炒好後的絞肉。圖片來源:cooking23s.blogspot.com |
(2)
把炒好放涼的絞肉與剩下的 130g 的生絞肉、嫩薑末、白胡椒粉用手攪拌混合均勻,密封冷藏一至兩個小時。
Mix the stir-fry with 130g of the pork mince, the chopped tender ginger root, and the ground white pepper. Stir them with your hand until they are well mixed. Refrigerate the mixture for 1-2 hours.
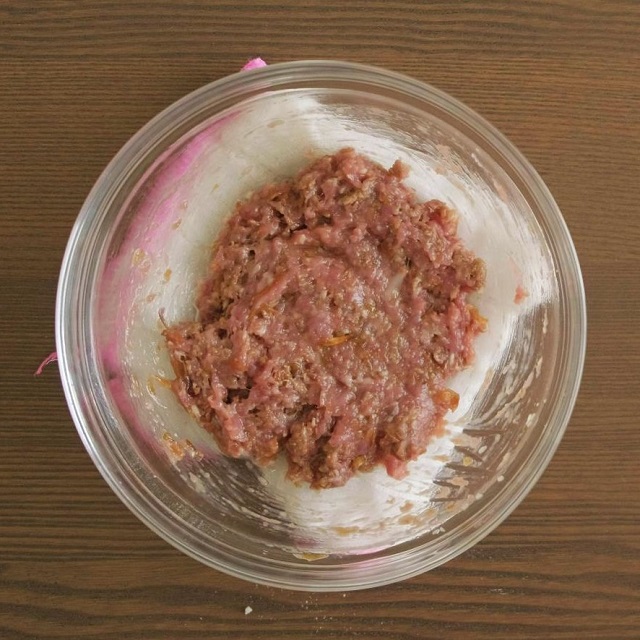 |
| 拌勻後的樣子。圖片來源:cooking23s.blogspot.com |
(3)
將製作外皮的所有食材混合,用攪拌機揉約十五分鐘,直到麵團變光滑為止。
Mix all of the ingredients of the wrapper. Use a dough mixer to knead them for about 15 minutes until the dough becomes smooth.
 |
| 揉好的麵糰。圖片來源:cooking23s.blogspot.com |
(4)
在工作檯(揉麵墊)上撒些粉心粉(中筋),用擀麵棍把麵團擀平,把麵團中的氣泡戳破,摺成三摺。(此步驟稱為「第一擀」。)
Sprinkle some plain flour on the counter. Use a rolling pin to roll out the dough. Poke the bubbles inside the dough and fold the dough. (The process is called "the first rolling".)
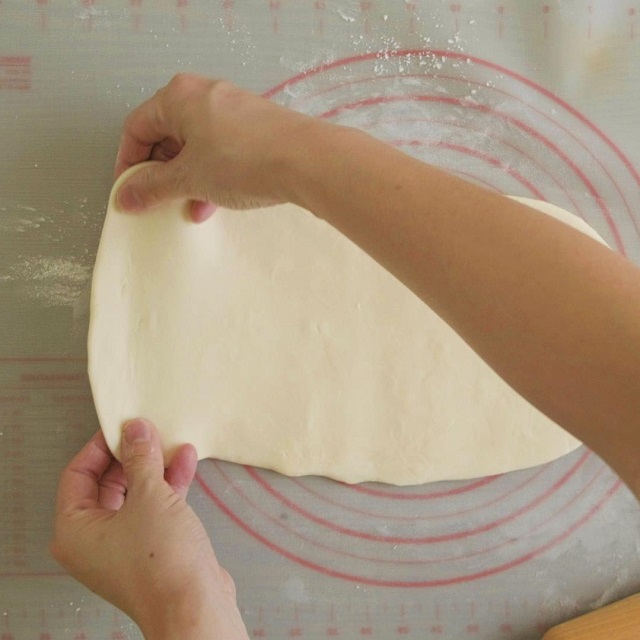 |
| 擀平後的麵團。圖片來源:cooking23s.blogspot.com |
 |
| 在三分之一處摺起。圖片來源:cooking23s.blogspot.com |
 |
| 摺好後的樣子。圖片來源:cooking23s.blogspot.com |
(5)
重複同樣的步驟。(此步驟稱為「第二擀」。)
Repeat the same process again. (The process is called "the second rolling".)
 |
| 把麵團再次擀平。圖片來源:cooking23s.blogspot.com |
 |
| 戳破氣泡。圖片來源:cooking23s.blogspot.com |
 |
| 摺好後的樣子。圖片來源:cooking23s.blogspot.com |
(6)
在工作檯(揉麵墊)上撒些粉心粉(中筋),用擀麵棍把麵團擀平,把麵團中的氣泡戳破,在麵團上噴些水,把麵團捲起來。(此步驟稱為「第三擀」。)
Sprinkle some plain flour on the counter. Use a rolling pin to roll out the dough. Poke the bubbles inside the dough. Spray some water on the dough and roll it up. (The process is called "the third rolling".)
 |
| 先噴些水再捲起來,這樣才黏得住。圖片來源:cooking23s.blogspot.com |
 |
| 收口處要黏好。圖片來源:cooking23s.blogspot.com |
(7)
秤麵團的重量,將麵團評分成六等份。
Weigh the dough and divide it into 6 equal parts.
 |
| 每份麵團重約五十公克。圖片來源:cooking23s.blogspot.com |
(8)
把麵團拍扁排氣與滾圓。
Punch the dough pieces to degas. Round them.
 |
| 把麵團內的氣泡去除,蒸好後的包子皮會比較平整。圖片來源:cooking23s.blogspot.com |
 |
| 滾圓過程中,放置一旁的麵團要記得蓋濕布保濕。圖片來源:cooking23s.blogspot.com |
(9)
把麵團稍微擀扁一點,使它們成圓片狀。
Roll out the dough pieces slightly and make them look like discs.
 |
| 操作過程中,放置一旁的麵團要記得蓋濕布保濕。圖片來源:cooking23s.blogspot.com |
(10)
把麵團擀成外薄內厚(邊緣薄、中心厚)的圓片。蓋上濕布,放置室溫十到十五分鐘。(此步驟稱為「鬆弛」。)
Roll them into discs which are thick in the centre and thin on the edge. Cover them with a piece of moist cloth and leave them at room temperature for 10-15 minutes. (The process is called "benching" or "resting".)
 |
| 擀成邊緣薄、中心厚,包好後的包子皮厚度會比較平均。圖片來源:cooking23s.blogspot.com |
(11)
把絞肉餡平分成六等份,滾圓成丸狀。
Divide the pork mixture into 6 equal parts and round them into balls.
(12)
把肉餡丸子放在麵糰中央,沿著麵團邊緣一路摺起皺摺,最後將收口處捏緊。共包六份。
Leave the pork ball on the centre of a dough disc. Fold creases around the edge of the dough disc and pinch close the opening. Repeat the process until you have made 6 of them.
 |
| 左手拇指壓住餡,右手拇指和食指提起麵皮捏約一公分的摺子,左手食指將麵皮往右推,邊捏邊往右旋轉,邊推邊捏摺子。圖片來源:cooking23s.blogspot.com |
 |
| 最後收口時,把收口處捏緊成魚口包。圖片來源:cooking23s.blogspot.com |
(13)
把包好的包子放在蒸籠裡,蓋上蓋子,把蒸籠放在裝水的鍋子上方,靜置室溫約半小時,直到每顆包子發酵到約七公分寬為止。
Leave them in a steamer on top of a pot with water. Put on the lid of the steamer. Leave them at room temperature for about 30 minutes until the width of each one has reached 7cm.
 |
| 發酵好的包子,麵皮顏色會變淺,側邊輕輕按壓後會有如棉花糖般慢慢回彈。圖片來源:cooking23s.blogspot.com |
(14)
把蒸籠放在三分之一鍋的滾水上,開中火,蒸約十五分鐘。關火後燜七分鐘再開蓋即可。
Leave the steamer on 1/3 pot of boiling water over medium heat for about 15 minutes. Heat off. Wait for 7 minutes before opening the lid. Then, voila!
 |
| 蒸包子時的模樣。圖片來源:cooking23s.blogspot.com |
 |
| 蒸好後的包子。圖片來源:cooking23s.blogspot.com |
 |
| 成品外觀示意圖。圖片來源:cooking23s.blogspot.com |
 |
| 切開後的樣子。圖片來源:cooking23s.blogspot.com |
旁白配樂版影片 Video Tutorial With Talking & Music:
原音重現版影片 Video Without Talking or Music (ASMR):
. . . . . . . . . . . . . . . . . . . . . . . . . . . . . .
. . . . . . . . . . . . . . . . . . . . . . . . . . . . . .
附 註(Footnotes):
(1)
先把一些肉炒過,混在餡裡面,這樣吃起來會比較香,餡也比較不會黏在一起。
Mix some stir-fried pork mince in the filling so that the filling can smell better and won't stick together.
(2)
要加一些薑,肉包吃起來才不會有腥味。
It's necessary to add ginger so that the pork bao won't be gamy.
(3)
天氣較熱時,加一些冰塊下去揉,讓麵團保持低溫,才不會發過頭。
In hot weather, adding some ice cubes while kneading can keep the dough at a lower temperature and prevent the dough from rising too much.
(4)
麵團在擀摺的時候,要先把粉撥掉,再噴一些水,這樣摺起來才黏得住。
During the rolling process, remove the dry flour and spray some water before folding the dough so that the dough can be sticky enough.
(5)
包的時候如果捏太多摺,摺痕等包子發好之後就看不太到了。
Don't make too many creases, otherwise you can hardly see the creases after the fermentation.
(6)
最後發酵時,如果天氣較冷,可以把包子放在烤箱裡面,用實際溫度四十度發半小時左右。
When the weather is cold, the pork bao can be left in an oven for about 30 minutes at an actual temperature of 40°C to ferment.
(7)
蒸的時候,如果用鐵蒸籠,蒸籠的底部要鋪一層布,蓋子也要用布包起來,別讓包子皮沾到水,要不然就不會發了。
If you use a stainless steel steamer to steam the pork bao, you should spread a piece of cloth over its bottom and wrap its lid with a piece of cloth to prevent the bao from touching water, otherwise it won't rise.
(8)
不要一蒸好就直接開蓋,這樣包子皮才不會太皺。
Don't take off the lid right after you turn off the heat, otherwise the skin of the pork bao will wrinkle too much.
(9)
剛蒸好的包子皮,看起來會比較皺。放涼後會變得較光滑。
The appearance will be smoother after cooling down.
(10)
肉包可以密封冷藏保存兩天,密封冷凍可以放兩星期。
The pork bao can be left in a closed food storage container in a fridge for 2 days, or in a freezer for 2 weeks.
(11)
冰過的肉包,要吃之前不用先退冰,直接用電鍋放一杯水蒸好,燜五分鐘再開蓋即可。
Before being served again, the pork bao can be steamed in a Taiwanese rice cooker right off the fridge or freezer. Just add 1 cup of water in the outer pot, turn on the rice cooker, and don't open the lid in the first 5 minutes after it turns off automatically.
(12)
恭喜網友 Kiki 試做成功! Congratulations on Kiki's success!
 |
| 圖片來源(Source of the Picture): www.facebook.com/kiki.chang.902 |
留言
張貼留言