-1.jpg "肉桂捲食譜") |
🔹 肉桂捲
老街上曾有一間古厝咖啡
我深深迷戀那裡的肉桂捲
那甜美香濃的誘人滋味
令人好懷念、好懷念...
肉桂捲又稱作肉桂麵包捲,是西方國家很常見的一種甜麵包。據說,世上的第一個肉桂捲,誕生於 1920 年代的瑞典。在社群媒體的推波助瀾下,肉桂捲也從 2020 年底開始突然在臺灣暴紅。這裡就為大家介紹,如何用水合法與布里歐麵團,製作臺灣常見的、口感介於麵包與蛋糕之間的超美味肉桂捲,包括肉桂餡與肉桂醬做法哦。(文末附影片)
🔹 Cinnamon Roll
There used to be an antique café on the old street.
I fell in love with the cinnamon roll there madly.
Its fascinating flavour was so aromatic and creamy
That I really really miss it so much...
Cinnamon rolls are also known as cinnamon buns, which are very common in western countries. It is believed that the first cinnamon roll was created in Sweden in the 1920s. Due to the social media impact, cinnamon rolls also suddenly started to cause a sensation in Taiwan at the end of 2020. Here, I'm gonna show you how to make the yummy cinnamon rolls (including the cinnamon drizzle sauce and cinnamon filling) commonly seen in Taiwan with the autolyse method and brioche dough. (See the video tutorial at the end.)
. . . . . . . . . . . . . . . . . . . . . . . . . . . . . . . . . . . . . . . . . . . . . . . . . . . . . . . .
材 料(Ingredients):
 |
| 製作肉桂捲的食材一覽。圖片來源:cooking23s.blogspot.com |
步 驟(Steps):
(1)
把酵母與奶油以外的麵包體食材混合拌勻。噴些烤盤油(食用油)在一個食品級塑膠袋內,把混合均勻的麵團放入袋中,冷藏三十分鐘。(此即所謂的「水合法」。)
Mix well all of the ingredients for buns except the yeast and the butter. Spray some pan spray (cooking oil) in a food-grade plastic bag and put the mixture (dough) inside. Leave it in a fridge for 30 minutes. (This is called the "autolyse method".)
(2)
將 135 公克的發酵奶油切成小方塊備用(其中的 75 公克待會要加入麵團,50 公克要加入內餡,10 公克要加入淋醬)。
Take 135g of cultured/churned butter. Dice and set aside 75g of it for the dough, 50g of it for the filling, and 10g of it for the drizzle sauce.
(3)
把 12 公克的新鮮酵母與 2 到 3 公克的水拌勻,備用。
Mix well 12g of fresh yeast with 2-3g of water. Set aside.
(4)
在麵包機的內鍋外圍放置兩到三個冰寶。
Put 2 or 3 cold packs around the pot of a bread maker.
 |
| 冰寶要先冰過再使用哦。圖片來源:cooking23s.blogspot.com |
(5)
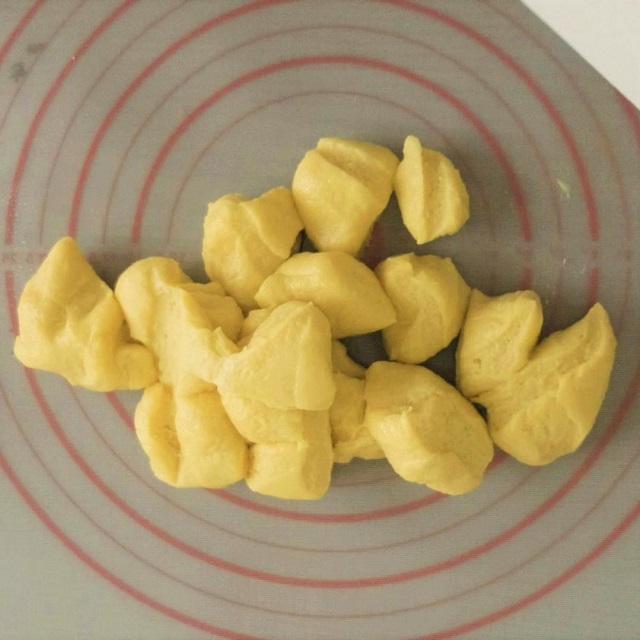
把水合法的麵團切成較小塊,備用。
Chop the autolyse dough into smaller pieces and set aside.
 |
| 切成小塊的麵團。圖片來源:cooking23s.blogspot.com |
(6)
把酵母與麵團放入麵包機,用麵包機攪打約十分鐘,直到麵團稍微出筋後,加入 50 公克奶油中的三分之一,繼續攪打約五分鐘,讓奶油完全被麵團吸收後,再加入三分之一的奶油,繼續攪打約五分鐘,讓奶油完全被麵團吸收後,再加入最後三分之一的奶油,繼續攪打約五分鐘,直到麵團能拉出薄膜為止。(麵團須全程控制在 28℃ 以下。)
Use the bread maker to knead the dough and the yeast for about 10 minutes. After the dough is slightly elastic, add 1/3 of the 50g butter and knead them for another 5 minutes or so. After the butter is well absorbed, add another 1/3 of the butter and knead them for another 5 minutes or so. After the butter is well absorbed, add the last 1/3 of the butter and knead them for another 5 minutes or so until the dough has an earlobe consistency. (The dough temperature has to kept below 28℃ during the whole process.)
 |
| 稍微出筋的麵團。圖片來源:cooking23s.blogspot.com |
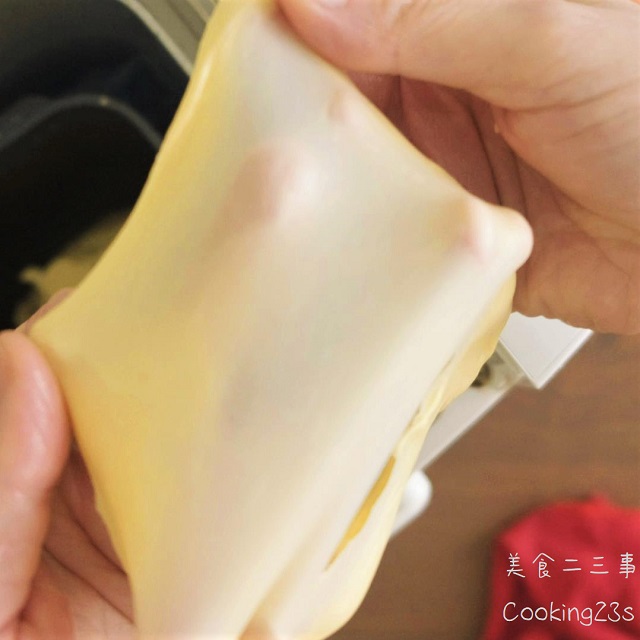 |
| 可切一小塊麵團測試是否能拉出像這樣的薄膜。圖片來源:cooking23s.blogspot.com |
(7)
在麵團上噴些烤盤油(食用油),蓋上食品級塑膠袋,放置室溫四十分鐘。(此即所謂的「基礎發酵」。)
Spray some pan spray (cooking oil) on the dough and cover the dough with a food-grade plastic bag. Leave it at room temperature for 40 minutes. (This is called the "primary fermentation".)
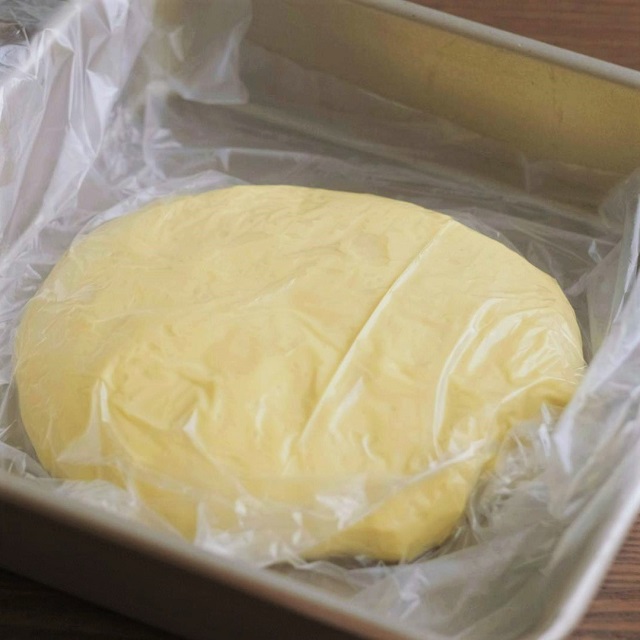 |
| 基礎發酵中的麵團。圖片來源:cooking23s.blogspot.com |
(8)
用手把麵團壓扁,三折後,再稍微壓扁,再三折,用塑膠袋包好,冷凍三十至四十分鐘。
Press and flatten the dough with your hands. Make it threefold. Press and flatten the dough again. Make it threefold again. Cover the dough with a plastic bag. Leave it in a freezer for 30-40 minutes.
 |
| 壓成這樣即可,不用壓得太薄。圖片來源:cooking23s.blogspot.com |
 |
| 三折成這樣後,即可包起來冷凍。圖片來源:cooking23s.blogspot.com |
(9)
待發酵奶油軟化後,把內餡的所有食材拌勻,備用。
After the cultured/churned butter is softened, mix well all of the ingredients for the filling. Set aside.
 |
| 拌勻備用的肉桂餡。圖片來源:cooking23s.blogspot.com |
(10)
用擀麵棍把麵團擀平成寬約 24 公分的長條狀,用手指把尾端壓薄一點。
Roll out and flatten the dough into a 24cm wide stripe with a rolling pin. Make the end thinner with your hands.
 |
| 尾端壓薄一點,以利待會捲起來收口黏合。圖片來源:cooking23s.blogspot.com |
(11)
用刮刀把肉桂餡均勻塗抹在擀平的麵團上,尾端留約兩公分寬不塗抹。用雙手在麵團左右兩側從頭輕輕往內、往下捲,收口黏合,用塑膠袋包好後,冷凍三十至四十分鐘。
Apply the filling onto the dough strip except the end of it. Roll the dough up with your hands. Cover it with a plastic bag and leave it in a freezer for 30-40 minutes.
 |
| 塗抹肉桂餡。圖片來源:cooking23s.blogspot.com |
 |
| 輕輕捲起來即可,不用壓太緊。圖片來源:cooking23s.blogspot.com |
 |
| 捲好、包好後的樣子。圖片來源:cooking23s.blogspot.com |
(12)
剪裁一張烘焙紙,將其鋪好在烤盤上(烤盤尺寸約為 22 公分 * 22 公分 * 5 公分)。
Cut and fold a piece of baking paper and put it on a baking tray of 22cm * 22cm * 5cm.
 |
| 關於剪裁的方法細節,文末影片中有詳細示範。圖片來源:cooking23s.blogspot.com |
(13)
把麵團切成九等份,整齊地排列放置在烤盤的烘焙紙上。在一個大保麗龍箱中放置兩碗 55℃ 的溫水,將烤盤擺在它們中間,蓋上蓋子,以 28℃ 發酵約一小時。記得中途要更換溫水。(此即所謂的「最後發酵」。)
Chop the dough into 9 equal pieces and arrange them onto the baking tray. Leave 2 bowls of 55℃ water in a big styrofoam case and put the baking tray between them. Put the lid on. Leave the dough at 28℃ for about 1 hour. Remember to renew the warm water midway. (This is called the "final rise".)
 |
| 先用尺量過,做記號後再切,才能切得平均。圖片來源:cooking23s.blogspot.com |
 |
| 每個捲跟捲之間要預留一點空隙。圖片來源:cooking23s.blogspot.com |
(14)
在鍋中加入 100 公克的砂糖與 20 公克的水,開中火。在砂糖尚未完全溶解前,不要攪拌。開始沸騰後,轉小火,持續滾煮糖漿,待其顏色呈現淡琥珀色後(此時溫度約為 170℃),一邊攪拌,一邊依序加入 10 公克的奶油與 100 公克的鮮奶油。關火,持續攪拌均勻後,加入肉桂粉與鹽,拌勻,開中火,加入 50 公克的水,將淋醬煮至合適的濃度為止。
Leave 100g of fine sugar and 20g of water in a pot over medium heat. Don't stir them until the sugar has completely dissolved. When the sauce starts to boil, turn down the heat to low level and keep boiling the sauce until its colour has become light amber at about 170℃. Add 10g of butter and 100g of whipping cream. Turn off the heat while keep stirring them. Add the cinnamon powder and the salt. Stir and mix them well. Turn on the heat to the medium level. Add 50g of water and boil the sauce until it has reached the ideal thickness.
 |
| 此時不能攪拌,以免反砂(融化的砂糖再次結晶變成固體)。圖片來源:cooking23s.blogspot.com |
 |
| 淡琥珀色。圖片來源:cooking23s.blogspot.com |
 |
| 煮好後的淋醬。圖片來源:cooking23s.blogspot.com |
(15)
將烤箱預熱至實際溫度 190℃。
Preheat an oven to 190℃ (the actual temperature).
(16)
把表面塗抹的食材混合拌勻,抹在發酵好的肉桂捲麵團上。
Mix well the ingredients for the topping. Apply them on top of the dough pieces..
 |
| 以專用的小刷子將蛋黃水均勻刷在麵團表面上。圖片來源:cooking23s.blogspot.com |
(17)
以實際溫度 190℃ 烤約十五分鐘後,將烤盤前後對調,再烤約十分鐘後出爐。出爐後,隨即將肉桂捲與烘焙紙從烤盤中取出。等要吃的時候再淋上淋醬即可。
Bake them at 190℃ (the actual temperature) for about 15 minutes. Turn the baking tray around and bake them for another 10 minutes or so. Get the cinnamon rolls and the baking paper out of the baking tray right after they are baked. Drizzle the sauce right before you dig in. Then, voila!
 |
| 剛烤好的肉桂捲。圖片來源:cooking23s.blogspot.com |
 |
| 最好等放涼後再把肉桂捲分開。圖片來源:cooking23s.blogspot.com |
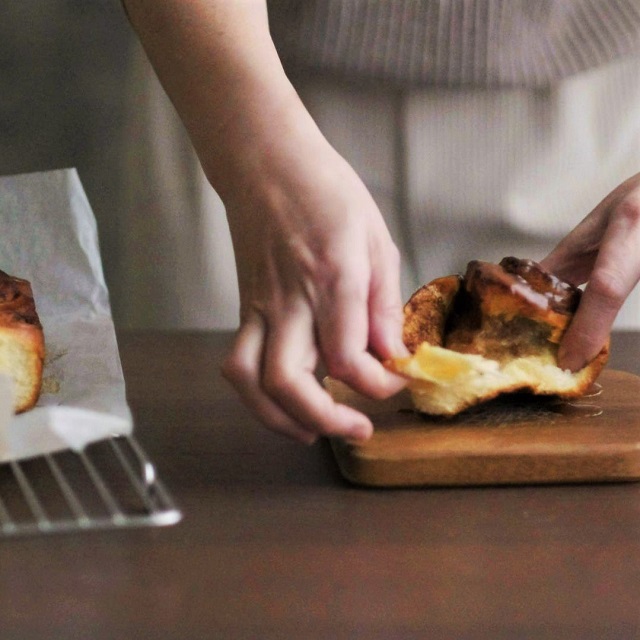 |
| 淋上淋醬、剝開後的樣子。圖片來源:cooking23s.blogspot.com |
旁白配樂版影片 Video Tutorial With Talking & Music:
原音重現版影片 Video Without Talking or Music (ASMR):
. . . . . . . . . . . . . . . . . . . . . . . . . . . . . . . .
. . . . . . . . . . . . . . . . . . . . . . . . . . . . . . . . (1)
麵包機放入冰寶,搭配使用水合法,較能控制麵團的溫度。
Using a bread maker with cold packs and the method of autolyse can help control the dough temperature more easily.
(2)
如果製作的量較大,可改用攪拌機,但要記得先把攪拌缸冰過,缸底也可放一盆冰塊水來降溫。
You can use a stand mixer instead if the dough is bigger, but the mixing bowl has to be chilled beforehand and you can also put a pot of ice water beneath the bowl while processing.
(3)
布里歐麵團做出來的麵包口感較綿密,但由於含有高比例的奶油、糖和雞蛋,筋性不易形成,需花較久的時間來攪打。
The texture of brioche buns is more delicate and silky. However, due to the high percentage of butter, sugar, and eggs, the dough needs to be kneaded longer.
(4)
麵團的奶油必須分三次加入,如果一次全下,麵團會變得太軟爛,反而更難打。
The butter has to be added separately, otherwise the dough will become too mushy to knead.
(5)
這種麵團的發酵必須保持在較低溫,做出來的麵包口感才會細緻。
The dough has to be kept at a low temperature so that the bun can have a delicate texture.
(6)
加些高筋麵粉,能讓內餡的口感更豐富,烤的時候也比較不會讓內餡流失。
Adding some bread flour can make the filling's texture richer and help keep the filling inside while baking.
(7)
這裡的內餡配方能讓肉桂捲內部不會黏在一起,並且口感極佳。如果比較注重外型,可不加麵粉,並增加內餡的糖的比例。
The recipe for the filling here can prevent the roll from sticking together and make it taste great. If you prefer keeping the shape, just leave out the flour and increase the proportion of sugar.
(8)
如果喜歡比較鬆軟的麵包口感,可以把最後發酵的時間延長十到二十分鐘。
If you prefer a fluffy texture of the bun, the final rise time can be extended by another 10-20 minutes.
(9)
不同烤箱的功率與上下火特性皆不同,需自己再斟酌烤溫、烤的時間與烤盤位置。
The efficiency and the characteristics of upper and lower heats are different among different ovens. The baking temperature, baking time, and baking tray's position need to be adjusted accordingly.
(10)
烤好的肉桂捲可室溫保存兩天,或冷凍保存兩週,淋醬可冷藏保存三個月。
The cinnamon rolls can be preserved at room temperature for 2 days or in a freezer for 2 weeks. The drizzle sauce can be preserved in a fridge for 3 months.
(11)
淋醬最好等到要吃的時候再淋,淋過淋醬就不能再復熱烤過,否則會變硬、變焦。
Drizzle the sauce right before you dig in. The sauce can not be baked, otherwise it will harden and become charred.
留言
張貼留言