 |
🔹 綠豆椪
爸媽以前每逢中秋必買綠豆椪
小時的我總覺得那沒什麼
長大後卻越來越喜歡這種淡淡的香與微微的甜
也才漸漸懂得什麼是默默付出的關愛與守候
綠豆椪是臺中豐原的一間餅店在日本時代發明的一種臺灣的傳統月餅。據說當初是因為某次烤餅時,師傅忘了將餅翻面,結果沒想到烤出來的餅皮又白又蓬鬆,一碰到就有如雪花般層層剝落,大受客人歡迎。由於外型看起來膨膨的,裡面又包綠豆沙,餅店的老闆娘就把它叫做「綠豆椪」。傳統的綠豆椪較大塊,也會在綠豆沙裡面包一些鹹的油蔥或是豬肉、肉脯。這裡為大家介紹的是最近較流行的小塊的綠豆椪,裡面僅僅包綠豆沙而已。這個綠豆椪的重量與蛋黃酥或月娘酥差不多,但因為我依照傳統綠豆椪的形狀把它稍微壓扁,因此會稍寬一些。壓或不壓,可依個人喜好而定,如果不壓的話,形狀和大小也與蛋黃酥或月娘酥差不多哦。(文末附影片)
🔹 Mung Bean Mooncake
Mum and Dad always bought mung bean mooncake every Mid-Autumn Festival.
I thought it was nothing special when I was little.
But I find myself enjoying its mild fragrance and sweetness more and more after growing up,
And begin to realise why true love sometimes can be unnoticeable.
Taiwanese mung bean mooncake (mung bean pastry) is a kind of traditional Taiwanese mooncake, which was invented by a bakery in Fengyuan, Taichung during the Japanese colonial period. Legend has it that one time the baker forgot to flip the pastry over, but, as a result, the crust on top surprisingly became white and flaky, and would come off like snowflakes after being touched, which was extremely appealing to customers. Because of its bulge shape and the mung bean paste stuffing, it was called mung bean pastry, which sounds like mung bean bulge in Taiwanese. Traditional mung bean pastries are larger and may contain some salty fried shallots or pork inside the mung bean paste. Here, I'm gonna show you how to make the fashionable smaller mung bean pastries, whose stuffing only contains mung bean paste and tastes really great. (See the video tutorial at the end.)
. . . . . . . . . . . . . . . . . . . . . . . . . . . . . . . . . . . . .
. . . . . . . . . . . . . . . . . . . . . . . . . . . . . . . . . . . . .
材 料(Ingredients):
 |
| 製作綠豆椪的食材一覽。圖片來源:cooking23s.blogspot.com |
步 驟(Steps):
(1)
將製作油皮的所有食材混合並揉到均勻成團,密封靜置室溫二十分鐘。
Mix all of the ingredients of pastry layer 1 and knead them into an even dough. Cover the dough and set aside at room temperature for 20 minutes.
 |
| 除了用無毒保鮮膜以外,也可用保鮮盒密封。圖片來源:cooking23s.blogspot.com |
(2)
將製作油酥的所有食材混合並揉到均勻成團,密封靜置室溫備用。
Mix all of the ingredients of pastry layer 2 and knead them into an even dough. Cover the dough and set aside at room temperature.
 |
| 保鮮膜最好還是不要直接接觸食物比較安全。圖片來源:cooking23s.blogspot.com |
(3)
把油皮麵團均分為六等份,蓋好保濕。把油酥麵團均分為六等份。
Divide the dough of pastry layer 1 into 6 equal pieces. Cover them. Divide the dough of pastry layer 2 into 6 equal pieces.
 |
| 油皮麵團較怕乾燥,務必隨時蓋好。圖片來源:cooking23s.blogspot.com |
(4)
將油皮麵團用手稍微壓扁後,包入油酥麵團,以虎口收麵皮,收口朝下,蓋好保濕。以同樣步驟做出合計六個為止。
Press a dough piece of pastry layer 1 into a disc. Put a dough piece of pastry layer 2 in the centre and fold it into a ball. Set it aside with the sealed side down and cover it. Repeat the process until you've made 6 balls in total.
 |
| 把油皮包入油酥。圖片來源:cooking23s.blogspot.com |
(5)
麵團收口朝上,以擀麵棍擀扁,用手捲起,收口朝下,蓋好保濕。以同樣步驟做出合計六個為止(第一次擀捲)。
Put a ball with its sealed side up on the counter and press it with a rolling pin. Roll it up with your hand. Set it aside with the sealed side down and cover it. Repeat the process until you've made 6 rolls in total. (This is the first rolling.)
 |
| 除非數量少、速度快,否則旁邊的麵團要記得蓋好保濕。圖片來源:cooking23s.blogspot.com |
 |
| 捲的時候要輕輕捲起來,不要捲太緊,烤好後才會有層次感。圖片來源:cooking23s.blogspot.com |
(6)
麵團收口朝上,用手稍微壓扁後,以擀麵棍擀扁,用手捲起,收口朝下,蓋好保濕。以同樣步驟做出合計六個為止(第二次擀捲)。室溫靜置二十分鐘(鬆弛)。將烤箱預熱至實際溫度160℃。
Put a roll with its sealed side up on the counter and press it with a rolling pin. Roll it up with your hand. Set it aside with the sealed side down and cover it. Repeat the process until you've made 6 rolls in total. (This is the second rolling.) Set them aside at room temperature for 20 minutes. Preheat an oven to 160℃ (actual temperature).
 |
| 擀的時候不要太用力、不要擀太薄,烤好後才會有層次感。圖片來源:cooking23s.blogspot.com |
 |
| 完成第二次擀捲。圖片來源:cooking23s.blogspot.com |
(7)
麵團收口朝上,以手指從中間壓下,將兩端往中間捏合,用擀麵棍稍微壓扁,包入三十公克綠豆沙餡,以虎口收麵皮,邊轉邊收口,收口務必密實捏合,滾圓,收口朝下,蓋好保濕。以同樣步驟做出合計六個為止。室溫靜置五分鐘(鬆弛)。
Put a roll with its sealed side up on the counter and press its centre with your finger. Pinch the 2 sides close. Press it into a thick disc with a rolling pin. Put a ball of 30g of mung bean paste in the centre and fold it into a ball. Pinch the opening carefully and tightly while rotating the ball. Round it. Set it aside with the sealed side down and cover it. Repeat the process until you've made 6 balls in total. Leave them at room temperature for 5 minutes.
 |
| 可用食指或拇指往中間壓下去。圖片來源:cooking23s.blogspot.com |
 |
| 以擀麵棍稍微擀扁。圖片來源:cooking23s.blogspot.com |
 |
| 綠豆沙餡要夠乾,烤了之後才不會爆餡。圖片來源:cooking23s.blogspot.com |
 |
| 以虎口收麵皮。圖片來源:cooking23s.blogspot.com |
 |
| 收口務必密實捏合。圖片來源:cooking23s.blogspot.com |
 |
| 包好的樣子。圖片來源:cooking23s.blogspot.com |
(8)
用一些紅麴粉加水調成紅色染料,備用。
Mix some red yeast rice powder with some water to make the dye. Set it aside.
(9)
將麵團移到烤盤上,用擀麵棍輕輕擀扁一點(也可不用擀扁,依個人喜歡的形狀而定),用大吸管沾些染料於麵團表面蓋上紅色的印。
Leave the balls on the baking tray. Press them gently and slightly with a rolling pin (this pressing process is optional). Use a big straw to stamp some dye on their surfaces.
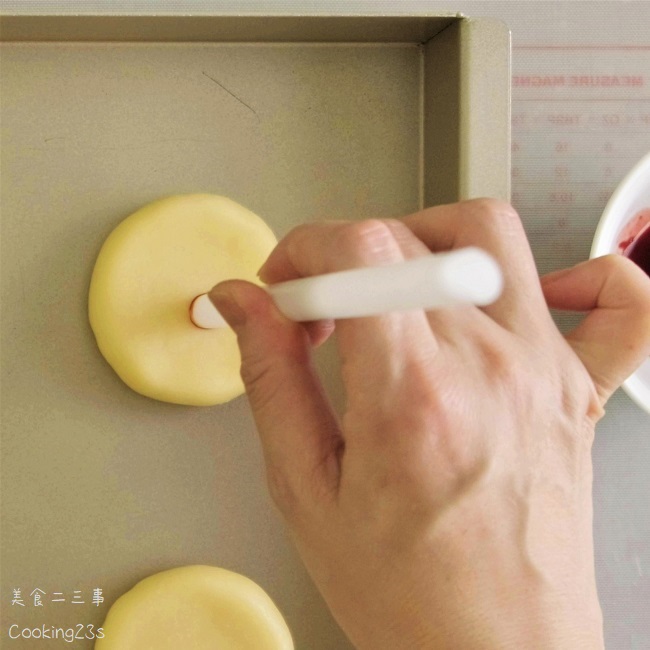 |
| 除了吸管以外,也可使用其它工具印上不同圖案。圖片來源:cooking23s.blogspot.com |
(10)
進烤箱,以實際溫度約 160℃ 烤約十五分鐘後,將烤盤前後對調,再烤約十分鐘出爐即可。
Bake them at about 160℃ (the actual temperature) for about 15 minutes. Turn the baking tray around. Bake them for another 10 minutes. Then, voila!
 |
| 每臺烤箱的特性不同,需要自行視情況斟酌烤溫與烤的時間。圖片來源:cooking23s.blogspot.com |
 |
| 烤好後,如果表皮會「翻毛」、層層剝落,就是完美的綠豆椪。圖片來源:cooking23s.blogspot.com |
 |
| 綠豆椪的特色是一層一層如雪花般剝落的白色酥皮。圖片來源:cooking23s.blogspot.com |
旁白配樂版影片 Video Tutorial With Talking & Music:
原音重現版影片 Video Without Talking or Music (ASMR):
. . . . . . . . . . . . . . . . . . . . . . . . . . . . .
. . . . . . . . . . . . . . . . . . . . . . . . . . . . .
(1)
無水奶油也可以用無鹽奶油代替,但是用無水奶油做出來會較酥。
The clarified butter can also be replaced with unsalted butter, but clarified butter can make the cake crisper.
(2)
油皮揉好之後要記得蓋好,別讓它變乾,等一下包起來才會好看。
Cover the kneaded dough well to prevent it from drying and make it look pretty after being folded.
(3)
油酥不要用手揉,手的溫度較高,揉起來會太過黏手,不好處理。若是揉起來太黏,可以拿去冰箱冷藏十分鐘之後再揉。
Don't knead the dough of pastry layer 2 with your hands. The temperature of your hands will make it sticky and hard to handle. If the dough becomes too sticky, it can be refrigerated for 10 minutes before being kneaded again.
(4)
自己做的綠豆餡,比外面買的現成的綠豆餡,好吃很多,有空一定要試看看。(可參考「綠豆沙做法(綠豆沙餡)」)
Homemade mung bean paste is far more delicious than the ready-made one bought from the market. Must try it if possible. (See "How to Make Mung Bean Paste")
(5)
把餡包好之後,先放五分鐘,等一下壓扁的時候較不會爆開。
Set them aside for 5 minutes after folding so that they won't burst easily while being pressed later on.
(6)
若是把油蔥酥(可參考「油蔥酥與油蔥醬(香蔥油)做法」)混一些醬油,包在綠豆沙裡面,就變成鹹甜口味的綠豆椪。也有人包肉脯哦。
If you put some fried shallots (See "How to Make Fried Shallots and Shallot Oil") with a little soy sauce inside the mung bean paste, you can make the sweet and salty version of mung bean mooncake. You can also put dried shredded pork inside instead.
 |
| 包油蔥酥的綠豆椪。圖片來源:cooking23s.blogspot.com |
 |
| 加點咖哩粉到油酥和自製綠豆沙餡中,並以絞肉 85g、醬油 13g、油蔥酥 40g、糖 5g、咖哩粉 2g、肉鬆 30g 做成肉餡,用 25g 咖哩味道的綠豆餡包住 10g 的肉餡,即可成為咖哩口味的綠豆椪,非常好吃。圖片來源:cooking23s.blogspot.com |
(7)
因為我們用的自製綠豆餡較沒那麼甜,做好的綠豆椪不能放太久。把綠豆椪封起來,室內可以放三天,放冰箱冷藏可以保存七天,冷凍可以放一個月。
Because homemade mung bean paste is not that sweet, the mung bean mooncake can not be preserved for too long. It can be preserved in a food storage container for 3 days at room temperature, 7 days in a fridge, or 1 month in a freezer.
(8)
恭喜網友 淑珊 試做成功! Congratulations on 淑珊's success!
 |
| 圖片來源(Source of the Picture):www.facebook.com/100000139642630 |
(9)
恭喜網友 smiling_annie 試做成功! Congratulations on smiling_annie's success!
 |
| 圖片來源(Source of the Picture): instagram.com/smiling_annie |
(10)
恭喜網友 polly lin 試做成功! Congratulations on polly lin's success!
 |
| 圖片來源(Source of the Picture): www.facebook.com/100000054286179 |
(11)
恭喜網友 旻珈 試做成功! Congratulations on 旻珈's success!
 |
| 圖片來源(Source of the Picture): www.facebook.com/100051415185388 |
(12)
恭喜網友 Yu-chih Chin 試做成功! Congratulations on Yu-chih Chin's success!
 |
| 圖片來源(Source of the Picture): www.facebook.com/yuchih.chin |
(13)
恭喜網友 家菱 試做成功! Congratulations on 家菱's success!
 |
| 圖片來源(Source of the Picture): www.facebook.com/827958819/ |
(14)
恭喜網友 chubimamia 試做成功! Congratulations on chubimamia's success!
 |
| 圖片來源(Source of the Picture): www.instagram.com/chubimamia/ |
(15)
恭喜網友 danboard_0917 試做成功! Congratulations on danboard_0917's success!
 |
| 圖片來源(Source of the Picture): www.instagram.com/danboard_0917 |
(16)
恭喜網友 童先生 試做成功! Congratulations on jacka00006's success!
 |
| 圖片來源(Source of the Picture): www.facebook.com/jacka00006 |
留言
張貼留言